
Deinterlace/Transcode C300 1080i MXF files FCP video format on Mac


Thread Starter
|
Member
Joined: Dec 2012
Posts: 56
Are you using the most popular and hotly-received professional camcorder Canon EOS C300? The new Cinema EOS camera, together with 5D Mark III, has successfully attract attention with its far more compact and less cluttered design, although not the price. Its new supper 35mm CMOS, DIGIC DV III Image Processor and Fully Compatible with New & Existing EF-mount Lenses make it meet the demanding needs of cinema industry professionals. It is a pity that you can't put the C300 1080i .mxf files on to Final Cut Pro (X) for further editing.

How to make Canon C300 MXF recordings editable in FCP?
In fact, Final Cut Pro 6.0.3 to Final Cut Pro 7.0.2 and Final Cut Pro X 10. 0.3 users can not enjoy the 1080i videos after editing, since XF Plug-in can not help them, only the 1280*720 video accepted. It means you have to convert C300 MXF footages to Final Cut Pro compatible format ProRes 422 .mov with a top MXF Conveter for FCP. I used Brorsoft MXF Converter fo Mac, which can fast transcode SD MXF videos to Apple ProRes 422 for FCP on Mac OS X with best vido quality. Here I take it as an example and share my solution.
Guide: Tips on converting and importing Canon EOS C300 1080i MXF files to Final Cut Pro with best setting on Mac.
Step 1: Install and launch the best MXF to FCP Converter for Mac from Google. Click the button �File� to add MXF files to it.
Tips:
a. If you want to merge MXF files, just need to check the �Merge into one� box.
b. You shouldn�t move the single MXF video out of the whole MXF whole structure folder, or the MXF video would loss some metadata, such as sound.
Step 2: Click on the �Format� and get the dropdown menu, then move you pointer to �Final Cut Pro�, and choose one. Then you can set the output folder by clicking �Browse� icon as you need.
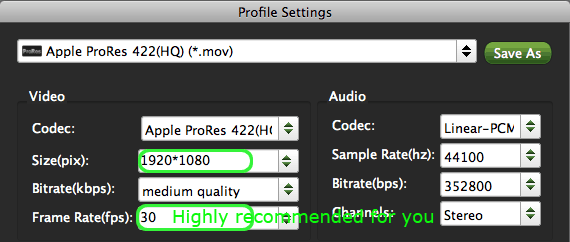
Step 3: Click the �Settings� icon and you can select and edit settings in the �Profile Settings� according to your needs and optimize the output file quality.
Step 4: Please click �Edit� and then you can deinterlace C300 1080i MXF files for editing in FCP in high video quality.
Step 5: Click the �Convert� button; it will convert C300 1080i MXF to ProRes for FCP on Mac immediately. You can find the process in the �Conversion� interface.
When the EOS C300 1080i MXF to ProRes conversion is completed, you will be able to get the export files for FCP by clicking on �import� button effortlessly, no need to go to the Log and Transfer. Now you can get C300 1080i MXF footages in FCP with best video quality on Mac.
How to make Canon C300 MXF recordings editable in FCP?
In fact, Final Cut Pro 6.0.3 to Final Cut Pro 7.0.2 and Final Cut Pro X 10. 0.3 users can not enjoy the 1080i videos after editing, since XF Plug-in can not help them, only the 1280*720 video accepted. It means you have to convert C300 MXF footages to Final Cut Pro compatible format ProRes 422 .mov with a top MXF Conveter for FCP. I used Brorsoft MXF Converter fo Mac, which can fast transcode SD MXF videos to Apple ProRes 422 for FCP on Mac OS X with best vido quality. Here I take it as an example and share my solution.
Guide: Tips on converting and importing Canon EOS C300 1080i MXF files to Final Cut Pro with best setting on Mac.
Step 1: Install and launch the best MXF to FCP Converter for Mac from Google. Click the button �File� to add MXF files to it.
Tips:
a. If you want to merge MXF files, just need to check the �Merge into one� box.
b. You shouldn�t move the single MXF video out of the whole MXF whole structure folder, or the MXF video would loss some metadata, such as sound.
Step 2: Click on the �Format� and get the dropdown menu, then move you pointer to �Final Cut Pro�, and choose one. Then you can set the output folder by clicking �Browse� icon as you need.
Step 3: Click the �Settings� icon and you can select and edit settings in the �Profile Settings� according to your needs and optimize the output file quality.
Step 4: Please click �Edit� and then you can deinterlace C300 1080i MXF files for editing in FCP in high video quality.
Step 5: Click the �Convert� button; it will convert C300 1080i MXF to ProRes for FCP on Mac immediately. You can find the process in the �Conversion� interface.
When the EOS C300 1080i MXF to ProRes conversion is completed, you will be able to get the export files for FCP by clicking on �import� button effortlessly, no need to go to the Log and Transfer. Now you can get C300 1080i MXF footages in FCP with best video quality on Mac.

Thread
Thread Starter
Forum
Replies
Last Post
JhonBong
Suzuki Sportbikes
0
Mar 12, 2013 10:00 PM
JhonBong
Suzuki Sportbikes
0
Mar 4, 2013 07:44 PM
JhonBong
General Motorcycle Tech
0
Jan 20, 2013 09:26 PM
alassia
General Marine Tech
0
Sep 5, 2012 08:17 PM